Chapter 1: Introduction to Snarkjs/Circom
snarkjs is a JavaScript library for the zkSNARK scheme. Similar to Zokrates, it provides another language, circom, to write circuits. Again, we extend it to generate proofs and verify proofs on Bitcoin.
Install
1. Install Circom compiler
curl -Ls https://scrypt.io/scripts/setup-circom.sh | sh
2. Install snarkjs library
Then install our extended version using the following command:
npm install -g snarkjs-scrypt
Workflow
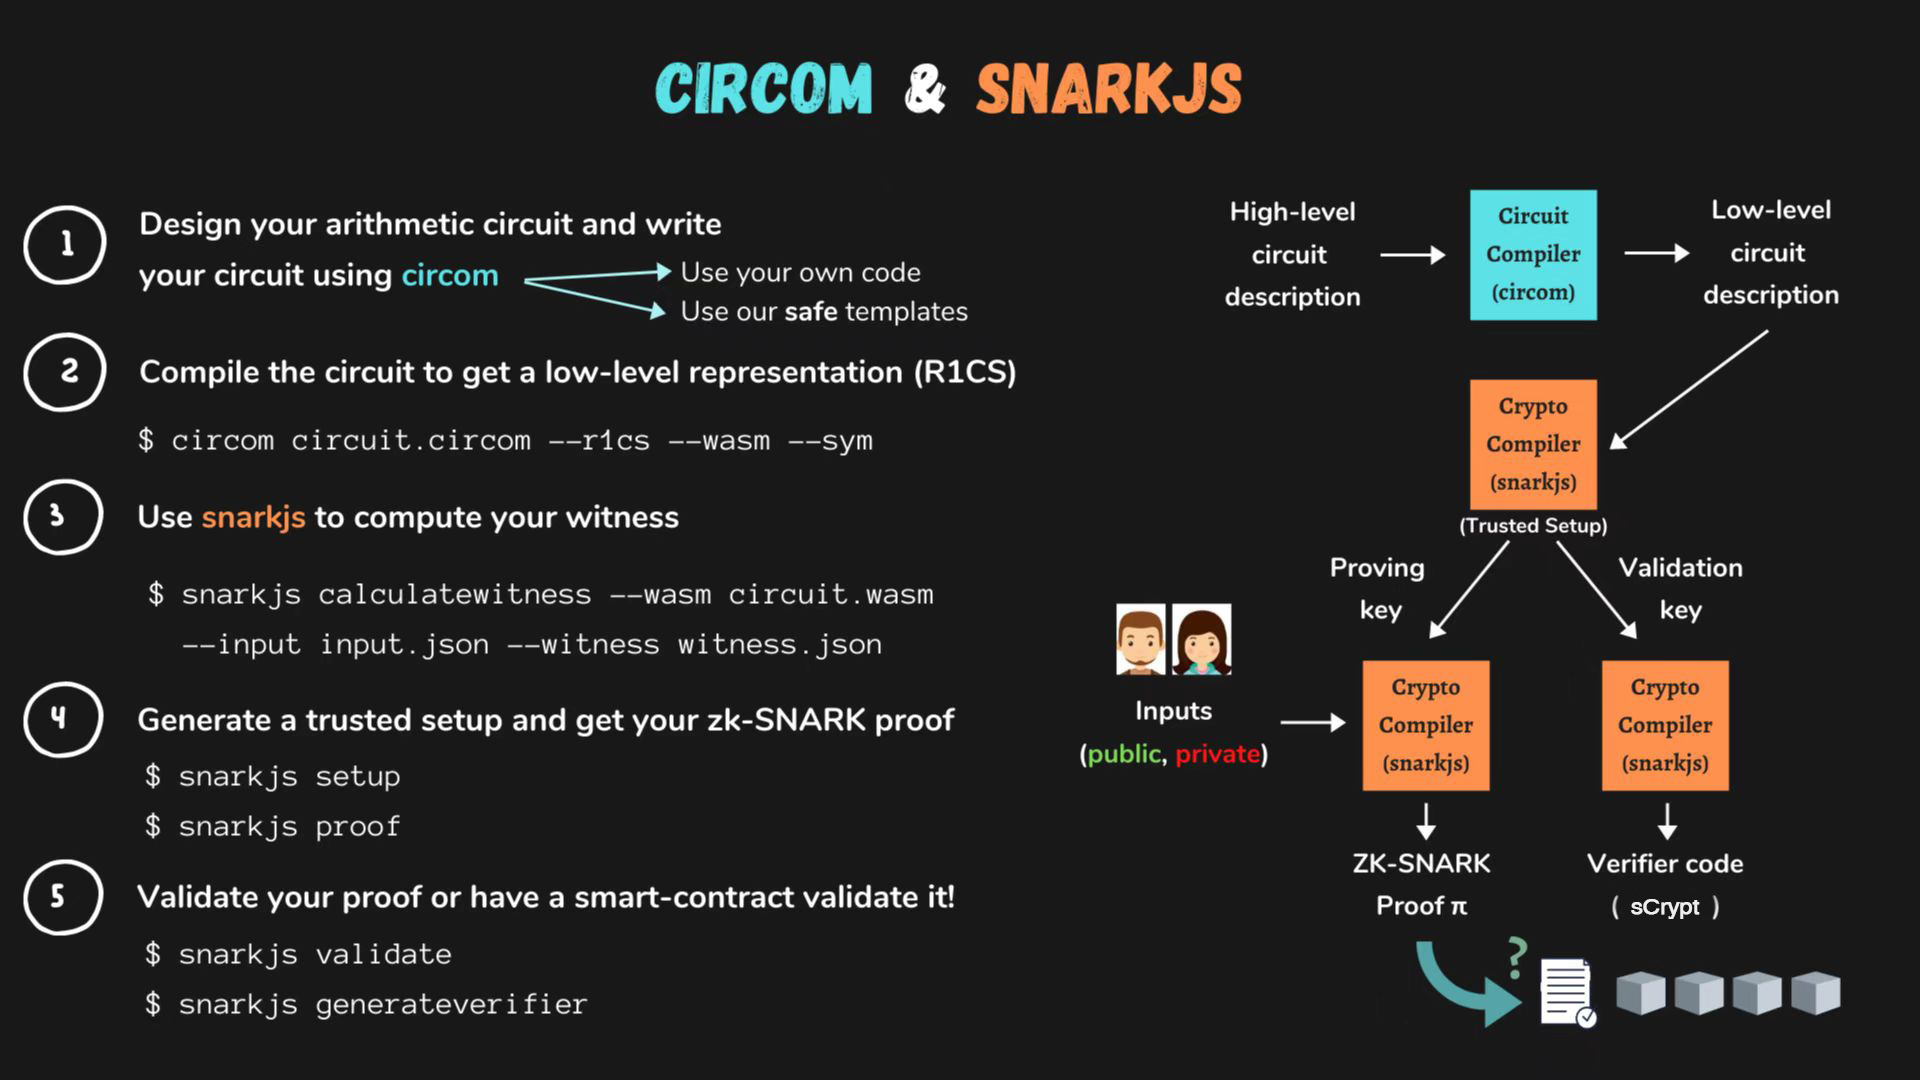
The entire workflow is the same as the original snarkjs, except that the verification step is done on Bitcoin. Generally, it consists of the following steps:
1. Design a circuit
Implement a circuit in the Circom language. For example, this simple circuit/program called factor.circom proves that people know to factor the integer n into two integers without revealing the integers. The circuit has two private inputs named p and q and one public input named n. For more information on how to use Circom, you can refer to https://docs.circom.io.
// p and q are factorizations of n
pragma circom 2.0.0;

template Factor() {

    // Private Inputs:
    signal input p;
    signal input q;

    // Public Inputs:
    signal output n;

    assert(p > 1);
    assert(q > 1);

    n <== p * q;

}

component main = Factor();
2. Compile the circuit
Compile the circuit with the following command:
circom factor.circom --r1cs --wasm
3. Start a new powers of tau ceremony
The new command is used to initiate the ceremony of powers of tau.
snarkjs powersoftau new bn128 12 pot12_0000.ptau
snarkjs powersoftau contribute pot12_0000.ptau pot12_0001.ptau --name="First contribution" -e="$(openssl rand -base64 20)"
snarkjs powersoftau prepare phase2 pot12_0001.ptau pot12_final.ptau
Finally we verify the protocol so far:
snarkjs powersoftau verify pot12_final.ptau
4. Setup
Currently, snarkjs supports 2 proving systems: groth16 and PLONK. Groth16 requires a trusted ceremony for each circuit. PLONK does not require it, it's enough with the powers of tau ceremony which is universal.
Plonk
snarkjs plonk setup factor.r1cs pot12_final.ptau circuit_final.zkey
Groth16
snarkjs groth16 setup factor.r1cs pot12_final.ptau factor_0000.zkey
snarkjs zkey contribute factor_0000.zkey circuit_final.zkey --name="Second contribution" -e="$(openssl rand -base64 20)"
snarkjs zkey verify factor.r1cs pot12_final.ptau circuit_final.zkey
5. Export verification key
We export the verification key from circuit_final.zkey into verification_key.json.
snarkjs zkey export verificationkey circuit_final.zkey verification_key.json
6. Calculating a witness
First, we create a file input.json containing the circuit inputs with the following contents:
{
    "p": 7,
    "q": 13
}
Next, we use the factor.wasm obtained from compiling the circuit to calculate the witnesses:
node generate_witness.js factor.wasm ../input.json ../witness.wtns
7. Create a proof
It uses the proving key and witnesses to generate a proof.
PLONK
snarkjs plonk prove circuit_final.zkey witness.wtns proof.json public.json
Groth16
snarkjs groth16 prove circuit_final.zkey witness.wtns proof.json public.json
8. Export an sCrypt verifier
This outputs a smart contract project under verifier/, that contains all the code needed to verify the proof on-chain.
snarkjs zkey export scryptverifier
9. Verifying the proof
You can verify it locally:
PLONK
snarkjs plonk verify verification_key.json public.json proof.json
Groth16
snarkjs groth16 verify verification_key.json public.json proof.json
Put it to the test
Complete the circuit on the right to ensure that the square of the private input x equals y .